Monday, August 24, 2009

how to use Google's mail server to send email

Just a little over 2 years ago I enrolled in a 3 month course from Wesley Chun in Intermediate Python, held in Los Altos Hills on the main campus of Foothill College. I found Wesley's lesson plan to be very challenging, but in my journey as a computer programmer since, one of the nuggets of wisdom I come back to is his lesson on writing internet clients. One small task he prompted us with was a valuable exercise on how to write clients that use the servers run by free email providers (yahoo, aol, hotmail, gmail). First, a little history on the instruction leading up to the in-class assignment... Why, I remember like it was yesterday (swirling, squiggly lines as harp strings are plucked & played by unseen angels should now be occupying your visual and aural landscape):

Internet Client programming
All internet clients are built on top of TCP

We talked about four internet clients: ftp, nntp, pop3, smtp
After covering ftp and nntp, Wesley began with an overview of email, how electronic mail as a system is complex and to operate it requires lots of working pieces:
  • Message Transport Agent
    • responsible for moving email, routing, queueing, sending of email.
    • sendmail, postfix, qmail, exim (unix)
    • exchange (windows)
  • Message Transport System
    • protocol used by MTAs to transfer email host-to-host
    • Simple Mail Transfer Protocol
  • Message User Agent
    • protocol used to get email from servers client-to-host
    • post office protocols
    • internet message access protocols
At one time, every desk with a workstation had an email server, but this framework was not scalable. Wesley talked about Python's poplib, and about the SMTP interface in smtplib:
  1. connect
  2. login
  3. send email
  4. quit
then he challenged us to write our own POP and SMTP clients.

As we go to press, the code below, tailored specifically to work with Google's SMTP server, was tested to work on Windows 2000 & Vista, and Debian Linux 5.0 (Lenny):
def use_gmail_smtp(te, tffn, ttfs, subject, msg_body):
from smtplib import SMTP
from email.MIMEText import MIMEText
from email.MIMEMultipart import MIMEMultipart
SMTP_server = 'smtp.gmail.com'
username = 'your gmail handle'
passwd = 'your gmail password'
msg = MIMEMultipart()
msg['From'] = tffn
msg['To'] = ttfs
msg['Subject'] = subject
msg.attach(MIMEText(msg_body))
server = SMTP(SMTP_server, 587)
server.ehlo() # see note below for Python 2.5 and 2.6 users
ssl_connection_errors = server.starttls()
ehlo_connection_errors = server.ehlo()
server.login(username, passwd)
server.sendmail('tpc247', (te, ), msg.as_string())
server.close()
A primer for the acronyms in the use_gmail_smtp() argument list:
  1. te is the target_email, the email address where you want the message to arrive
  2. tffn is the_from_field_name, what you want the user to see in the From: field's name portion. To tffn, Gmail will append <your_gmail_handle@gmail.com>
  3. ttfs is the_to_field_string, what you want the user to see in the To: field, usually in the format:
    "Your Name <yourname@company.com>"
A previous incarnation of the code behaved correctly on Python 2.5, but strangely enough, not on Python 2.6, because it called:
...
server.helo()
ssl_connection_errors = server.starttls()
...
resulting in the error:
Traceback (most recent call last):
...
File "", line 11, in use_gmail_smtp
ssl_connection_errors = send_server.starttls()
File "C:\Python26\lib\smtplib.py", line 611, in starttls
...
SMTPException: STARTTLS extension not supported by server.
It's a mystery to me why this error is only on the aforementioned version of Python, but switching the call out was the answer.

I tested my script on 3 different operating systems, each running at least two different versions of Python:
  • Windows
    • 2000: Python 2.6.1, 2.6.2
    • Vista: Python 2.5.4, 2.6.1, 2.6.2
  • Debian Linux 5.0 Lenny: Python 2.5.2, 2.6.1, 2.6.2
Other notes: when installing Python 2.6.1 on Windows Vista, for the first time ever I saw:
Please wait while the installer finishes
determining your disk space requirements
and then the installation would stall and never complete. The workaround is to open a command prompt, and type:
msiexec.exe -package <mypackage.msi> –qr
Reference: http://bloggingabout.net/blogs/jpsmit/archive/2009/08/28/please-wait-while-the-installer-finishes-determining-your-disk-space-requirements-message-drives-me-nuts.aspx

For you who would like to use gmail to send emails that look like they come from your workplace, you can now do so without the "on behalf of" that make you look less than authentic.

Reference: http://gadgetwise.blogs.nytimes.com/2009/07/31/gmail-drops-the-dreaded-on-behalf-of-lingo/

Thursday, August 20, 2009

Spanish Lesson 1, or Leccion de Español Uno

Thanks to Tim Goodman, two of my favorite television shows are Breaking Bad, and Dexter. Both take place in cities with a relatively large percentage of native Spanish speakers: Albuquerque, New Mexico and Miami, Florida. As someone who has made a living with associates who grew up speaking a different language, knowing the native tongue of your coworkers can serve as a social lubricant and engender a degree of respect and consideration from your bilingual colleagues when it comes time for a promotion, or, who to invite to that party. I was fortunate to walk into my first Spanish class at a young age, in my preteen years, and with the teacher talking very fast in her foreign language (then immediately in English to translate). From that point forth it was almost a settled matter: two years of Spanish in high school, the community college summer course in conversational Spanish, and two summer trips in Mexico to help erect a church in a small village near the border, were foundational events that made me want to build on that knowledge and spend time figuring out and understanding what exactly people were saying (sometimes about me).

For your benefit and mine, I have transcribed and translated two pieces of content where the characters are talking rapidly in a foreign language:

In this scene, Hank has just been promoted to a Drug Enforcement Administration tri-state task force based in Texas near the Mexican border. The three speaking roles are, in order of speech, Dean Norris as Hank, Todd Terry as the SAC (Special Agent in Charge), and J.D. Garfield as Vanco:

voy atravesar sobre esos bastardos como caca pasando pato, fijate (or fija te).
I'm going to run through those bastards like feces through a duck, you watch.

The two leads in this scene are Jimmy Smits as Miguel Prado (seated) and Michael C. Hall as Dexter Morgan. The shopkeeper Francisco is played by Rudy Quintanilla.

Olvida te, que ese pide lo de siempre
Forget it, that one always orders the same thing.

One might substitute "that one" with "he" but doing that wouldn't tell you the whole story. In context, the shopkeeper understands that Miguel is talking about Dexter, but the shopkeeper also would have known that in Spanish, he is el, but you use ese, meaning that one, when you point to someone, or indicate a person, you don't particularly care for.

Thanks to the lovely and pregnant custodian Sandra Barron, and to mi bibliotecaria preferida Patricia Medina, for the respective transcription and translation. I should also mention David Montgomery for the heads up about Scott Aaronson and the following piece of wisdom:
Why do native speakers of the language you’re studying talk too fast for you to understand them? Because otherwise, they could talk faster and still understand each other.
Reference: http://scottaaronson.com/blog/?p=418

Saturday, August 15, 2009

Isabella at Disneyland, post 9/11

On July 21 and 22, my sister and brother-in-law took a trip to celebrate my beautiful niece turning the terrible 2. At the Magic Kingdom, the little princess explored a potential career as a freedom fighter in the war on terror.

21JUL2009TUE Disneyland
Marine Corps sniper (223rd Battalion, Mickey Mouse company) Monica Wickman-Mroch spots a possible jihadist and instructs Isabella, private-in-training, on the finer points of target shooting:
  1. Breathe in
  2. Breathe out
  3. Aim
  4. Squeeze
22JUL2009WED Dumpling House in Artesia, 1 of 4
The next day, at Dumpling House in Artesia, Monica Wickman-Mroch mulls a run for her assault rifle (not pictured) as my niece, in her dress blues, poses with my sister.

22JUL2009WED Dumpling House in Artesia, 2 of 4
Isabella discovers an affinity for this thing called 'cake'. Seconds before, she performed a visual sweep of the table for any sugar packets, her favorite IED (improvised entertainment device).

22JUL2009WED Dumpling House in Artesia, 3 of 4
Light, fluffy & sweet (don't think Isabella wouldn't hesitate taking your eye out with that fork!), cake is a refreshing change from the relentless battlefield stressors of people in costume, clowns, and tea cup rides.

22JUL2009WED Dumpling House in Artesia, 4 of 4
The life of a patriot can make a freedom fighter hungry for food and company, as evidenced in this photo, seated with (left to right) Monica Wickman-Mroch, brother-in-law Brian Moffat, my dad, step-mom & half-sister, and Walter Mroch.

Saturday, August 8, 2009

how to host and serve your audio files on Youtube

I recently created this video:


Reference: http://tpc247.blogspot.com/2009/07/while-on-my-bike-i-recently-hit-car.html

It's not really a video per se, more of a slide-show with narration. As we go to press, Youtube does not allow uploading of audio files, even if your song, radio program, or interview recording is in mp3, wma or wav file format. If you have aural content you'd like to share with members of the general public, and you'd like to use Youtube, you might as well have hit a dead end. However, there is a way around the restriction so that one of the most popular video sharing services can host and serve your file:
create a video with your audio file content as the soundtrack.
It's easier than it sounds. You'll need uMusic (free open-source software):
uMusic 0.3

If you have a set of photographs or images, and an audio file, you have all you need for uMusic to create a Windows Media Video (wmv) file which you upload to Youtube. However, to prepare your images for public consumption, you may want to give proper attribution to the owners of the photos, or enhance your brand by imprinting a visible watermark that lets users know about you. Also, your audio file may contain commercials, announcements, or something unrelated to what your audience may want to hear, so you'd like to edit your content to remove unwanted blocks of time and extract only what you desire. In either case, you'll need the following free tools, respectively:How to insert text into an image in Irfanview

First open the image in Irfanview
  1. Select an area, an outline rectangle, wherein your text will sit
  2. Select 'Edit'/'Insert text into selection'
  3. Type in your text
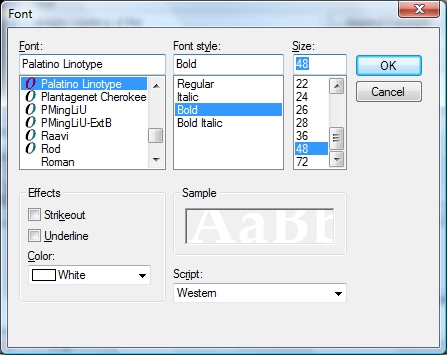
  4. 'Choose Font' and determine the proper font face, size and colorIrfanview_Choose Font
The negative about using this method is Irfanview doesn't give you a way to undo the text you insert into the outline rectangle. If you don't like the result, you have to start over at step 1.

If you're new to Audacity, we showed earlier how to use Audacity to edit an audio file

Reference: http://www.pcworld.com/article/136089/top_10_video_sharing_sites.html

Thursday, August 6, 2009

how to use Audacity to edit an audio file

This tutorial covers how to use Audacity 1.3 beta, free open-source software, to edit an audio file. Because of patent restrictions, Audacity does not come with the ability to save your audio file as an MP3. After you install Audacity, make sure you install the free LAME encoder to enable Audacity to export to the MP3 digital audio encoding format.

Reference: http://audacity.sourceforge.net/help/faq?s=install&item=lame-mp3

Our goal is to extract only desired content from a larger audio file and save it all into a smaller audio clip. Let's say we desire audio content that is concerned with a single topic, in this case, who is at fault when a bicyclist collides with a car door:

The soundtrack to the video above is a clip that actually consists of two segments. Each segment consists of multiple smaller pieces. The first of two segments involves a caller named Sunny, the second a caller named Jim. Each segment is comprised of pieces that were first selected, roughly around two predetermined times denoting beginning and end, then copied into a new work area, where they were then sculpted (i.e., extraneous slices removed). Finally the pieces were ready to be set aside, each prepared for the task of joining into a segment. The segments were then merged into a clip, following the same process.

Here we begin with an hour-long audio file recently imported into Audacity:
Audacity_recently imported audio file
At this point I should note during this tutorial there will be prodigious use within Audacity of:
  • the keyboard space bar
  • the mouse left button
to determine during playback where the desired content starts and stops. Once you load the audio file into Audacity, click anywhere within the waveform of the file, and depress the left-click button to indicate where you want to start play. Press the space bar to start and stop.

To edit the audio content, we first make the rough cuts, then the fine cuts. When you've become well-practiced with Audacity, after this tutorial, you can skip the rough cuts, and use the zoom feature to make fine cuts from, say, an hour-long audio file. For now, since we're just getting acquainted with Audacity, we don't want to overwhelm the new user with zooming in & out and dragging the mouse across multiple views of the audio file.

Let's say that, from what my eyes and ears perceive, the first piece of our Sunny segment is from 11:32 to 16:39. Once you've identified the approximate beginning and stop points, the rough boundaries, train your eyes on the "Selection Start" and "End" boxes next to 'Audio Position':
Audacity_selected segment of audio file
Audacity_select start, end and audio position boxes
Note that if you click on the 'Length' radio button, the 'Selection End' box becomes a 'Length of Selection' box. As luck would have it, my mouse landed just 2 seconds before the estimated beginning of our desired content, and we make sure to end our selection on or slightly after what our ears had earlier perceived to be the stop of the track. Now that we have our first rough piece of our desired content segment, our next step involves using the analogy of finding a clean table or workspace to put our pieces of desired content for the purposes of sculpture and assembly into a single segment. Click on File/New and open a brand new Audacity window (for you users of audio editing software Soundforge, this is akin to creating a new stage). Now paste your copied audio content into the empty window. Notice that since the audio content in question is much shorter than an hour, you can easily select the slices you want to throw away, and delete them.

To wrap up this tutorial's editing portion, repeat the following steps for the other pieces of the segments:
  1. Open your audio content file and play it
  2. Note to yourself, or better yet, write down the start and end boundaries of your desired piece of content. Be ready with a pen and piece of paper to record where the start and stop points are.
  3. Click on File/New to create an Audacity window that you have purposed for sculpting and joining pieces of a segment
  4. Select, from the primary Audacity window, the rough piece of desired content; it's ok if you're off by a few seconds. Paste the copied content into the new Audacity window.
  5. Carefully sculpt the rough piece. Remove extraneous slices, such as dead air and fragments of unwanted content.
Once the pieces of audio content have been prepared, our concern is joining them into a larger segment. Go to your secondary Audacity window, and follow these steps from the Audacity website to splice two files together:
  1. Select the second file by clicking on its label (the area around the mute/solo buttons).
  2. Choose “Find Zero Crossings” from the Edit menu.
  3. Choose “Cut” from the Edit menu.
  4. Place the cursor by clicking in the first track, after the end of the audio.
  5. Choose “Paste” from the Edit menu.
Reference: http://audacity.sourceforge.net/help/faq?s=editing&i=join

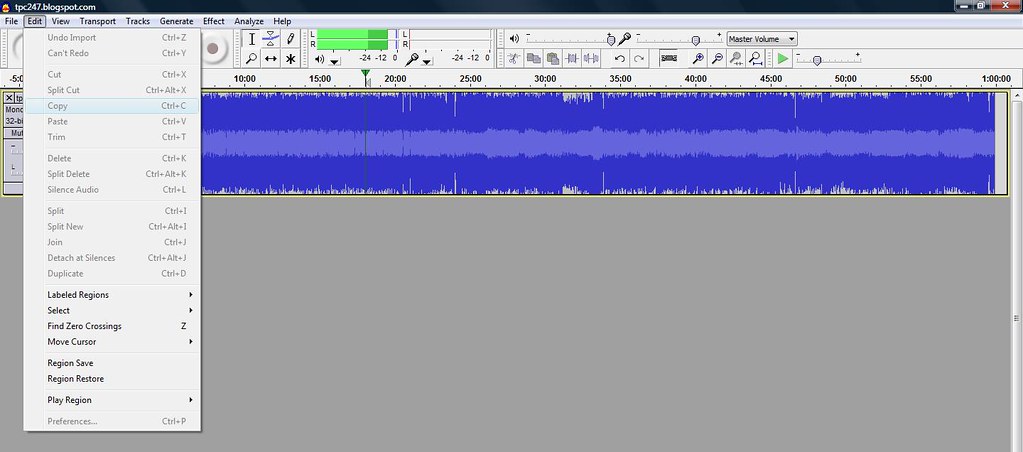
At some point you might select some content in your audio file, and see now you're not able to cut, copy, paste or delete:
Audacity edit options not enabled
You notice the edit toolbar is not functional and will say "I'm not able to edit" or "Audacity won't let me edit", and ask "is the edit toolbar not enabled ?", "why can't I edit ?", or "how do I enable the edit toolbar ?". All good questions, seeing as how the options are grayed out, so you're unable to edit your audio file. There's a simple solution: make sure the playback is stopped.

Now that you have an audio file containing only what you want and need, you may like to know how to host and serve your audio files on Youtube.